Creating, Navigating and Running a Case
You can use either the System Explorer or the Modeler to create, navigate and run an analysis case.
Create / Edit a Case using System Explorer
To create (or edit) an analysis Case in System Explorer:
Open System Explorer.


In the navigation pane, select Sigmafine Analysis.
Click the Analysis down-arrow and select the analysis for which you want to create or run a case.
To create a new case, you use the Case Properties window. To edit an existing case, you first need to select the Case and can then change the properties under the 'General' tab in the Case details display.
Follow the appropriate steps for the action you want to take:
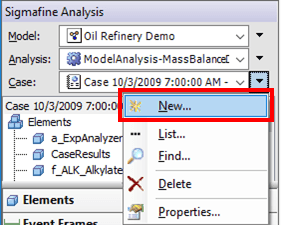
If creating a new Case in System Explorer
Click on the Case menu arrow
 and select New, as shown in the following image.
The Case Properties window opens.


In the Name box, type a name for the new case.
Continue on to step 5.
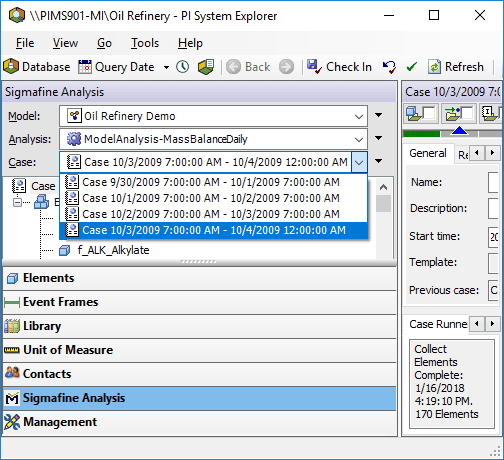
If editing an existing Case in System Explorer
Click the Case down-arrow and select the Case as shown in the following window, or select the Case on the Analysis tree.

The selected case's details display in the System Explorer window. Edits can be made under the General tab in the details display.
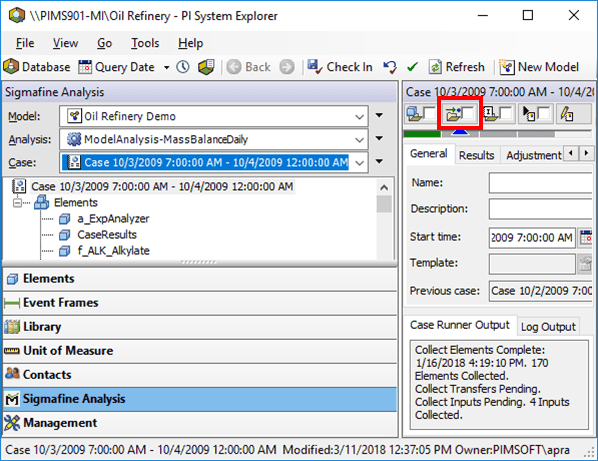
If the 'General' tab is not showing in the details display, click on Properties (as shown in the following image) to display it.

Continue on to step 5.
Regardless of whether you are creating a new Case or opening an existing one, the same properties are available.
Note: When creating a new case, the case Start time and End time boxes are automatically filled in by the time rule. However, you can edit these dates if needed (see steps 3 and 4 for details).
- To change the Case description: Click in the **Description** box and type the description you want.
To change the start date and time: In the Start time box, type in a different start date and time, or click the
 Calendar button to select them.
To change the end date and time: In the End time box, type in a different end date and time, or click the
Calendar button to select them.Editing an existing Case ONLY: To change the Start time and End time of an existing Case in System Explorer, you can edit those times on the General Tab. If using the System Explorer, the General tab can be seen by clicking on Properties in the Case Menu as shown below.
If a previous Case exists, it appears in the Previous Case box.
EXAMPLE: Previous Case box displaying a previous case


If you made any specific choices for the case (selecting/deselecting layers, removing elements from the Case analysis, etc.) that you want to use in the new case. The default Case shown in the field is the Case created prior to the new case. If this is the first Case for an analysis rule, there is no previous case.
(Optional) To change the previous case: Click the Change button to open the Case Search window.
Use the Case Search window to search for a case.
In the Search Results box, select the Case you want to use as the 'previous case'.
If you do not want to use a previous case, make sure that no Cases are selected in the Search Results box.
When finished searching, click Close to close the Case Search window.
Note: Some analysis rules require a previous Case to exist before you can run an analysis. If necessary you can create a first Case to serve as a "previous" Case for these analysis rules and start running the Cases from the second case.
You are ready to run the analysis. Refer to Running an Analysis Case for details.
Create / Edit a Case using Modeler
To create (or edit) an analysis Case in Modeler:
Open SF Modeler.
From the toolbar, select the analysis for which you want to create or run a case (as shown in Figure 187) below.


Follow the step(s) below that apply to the action you want to take:
If creating a Case using Modeler
Click on the
 New Case icon to open the Case Properties as shown in the following image.
In the Name box, type a name for the new case.
Continue on to step 4.
If creating a new Case in Modeler
To create a new case, click on the
New Case icon to open the Case Properties window.The Case Properties window opens.

In the Name box, type a name for the new case.
Continue on to step 4.
- To change the Case description: Click in the **Description** box and type the description you want.
To change the start date and time: In the Start time box, type in a different start date and time, or click the
Calendar button to select them.To change the end date and time: In the End time box, type in a different end date and time, or click the
Calendar button to select them.If a previous Case exists, it appears in the Previous Case box.
EXAMPLE: Previous Case box displaying a previous case

If you made any specific choices for the case (selecting/deselecting layers, removing elements from the Case analysis, etc.) that you want to use in the new case. The default Case shown in the field is the Case created prior to the new case. If this is the first Case for an analysis rule, there is no previous case.
To change the previous case: Click the Change button to open the Case Search window.
Use the Case Search window to search for a case.
In the Search Results box, select the Case you want to use as the 'previous case'.
If you do not want to use a previous case, make sure that no Cases are selected in the Search Results box.
When finished searching, click Close to close the Case Search window.
Note: Some analysis rules require a previous Case to exist before you can run an analysis. If necessary you can create a first Case to serve as a "previous" Case for these analysis rules and start running the Cases from the second case.
You are ready to run the analysis. Refer to Running an Analysis Case for details.
Running an Analysis Case
Once you have created, edited or selected the Case for the analysis, you are ready to run the analysis. It can be run in System Explorer or Modeler, and is done by using the checkboxes on the Case Runner button bar to select the functions you want to run. You can manually run the functions or use the 'Auto-Run' feature, which is described later in this topic.

Note: If the Case Runner button bar is not visible, click on the View menu and select Case Runner.
The following table provides the function of each button on the Case Runner button bar.
| Button | Function |
|---|---|
| Collect Elements – Establishes the elements to include in a case, based on their inclusion in any of the active layers of the case / display. | |
| Collect Transfers – Locates any transfer to include in a case, based on the transfer s' time and whether it is connected to any elements in the case. | |
| Collect Inputs – Collect all inputs for the analysis to use in running the case. | |
| Run – Run any pre-analysis validation steps & the analysis for the current case. | |
| Publish – Send output results of the analysis back to the attributes' configured data source. | |
| Status bar – Each button has a status of success (green) or failure (yellow). Move the mouse pointer over the status bar to see more information or see the 'General' tab of the Case properties for a summary. | |
| Auto-Run Check Box – Each button has an auto-run checkbox that allows the step to be run when you click the button for the subsequent step. See Using the Case Runner Auto-Run Feature to Run the Analysis for more details on using this feature. |
Manually Running the Analysis Functions
To run the analysis functions manually, you click on each function to run it.
A good example for using the manual method is when validation or observation needs to occur at each function. With this method, the buttons would not be checked, as shown in Figure 192.

To run the functions manually:
- Ensure that none of the function button checkboxes are checked (as shown in Figure 192).
- Click on a function's button to run that function.
- Repeat step 2 for each function you want to run.
- After you have successfully run all the functions, click the Publish button to publish the analysis results.
Using the Case Runner Auto-Run Feature to Run the Analysis
Each button has an auto-run check box that allows the step to be run when you click the button for the subsequent step. If the box on a button is checked, that step is executed when you click a button to the right.
Note: If the Auto-Run feature checkboxes are not visible on the AF Analysis Toolbar buttons, right-click on the Case Runner button bar and select Configure, to customize the buttons.
The scenarios below provide some examples for using the Auto-Run feature.
Scenario A - Run all functions
In this scenario, all the functions are executed (except for Publish) when you click the ![]() Run button. This scenario is useful when the data is normally valid and no manual intervention is needed.
Run button. This scenario is useful when the data is normally valid and no manual intervention is needed.

Scenario B - Run the Collection functions
In this scenario, the collection functions (collect elements, collect transfers, collect inputs) are executed when you click the Collect Inputs button. This scenario is useful when data needs to be valid before you run the analysis.

To allow Auto-Run to automatically run each function:
Check the checkbox for the first function you want to run.
Check the checkbox for the second function you want to run.
As you check this checkbox, the previous function you had checked in step 1 automatically runs.
Repeat step 2 for each additional function you want to run.
When finished running the functions successfully, click the Run button.
If you do not want the 'Run' function to initiate right away, do not click the Run button. Instead, check the Run button checkbox. The Run will then initiate only when the Publish button is clicked.
Click the Publish when you are ready to publish the analysis results.
If you selected to have the Run function initiate during the Publish function, the Run function will process prior to the Publish function.